A hands-on lab covering both TLS decryption methods in Wireshark — the
private key method for non-PFS (RSA) sessions, and
SSLKEYLOGFILE for PFS (DHE/ECDHE) sessions — with real
capture examples for each.
Much of the conceptual framing here draws on Sally Vandeven's SANS GIAC Gold paper on network forensics and HTTP/2: giac.org/paper/gcia/10847. Labs 5.2 and 5.4 in that paper cover decrypting forward secrecy and exploring HTTP/2 — the labs below are my own hands-on version of those concepts.
§ 1 Foundations
1.1 HTTP vs HTTPS — The Basics
HTTP (Hypertext Transfer Protocol) is one of the most common network protocols on the internet, most commonly used to deliver web content. At its core it's an ASCII-based protocol, originally designed to deliver text and markup documents. It's a stateless protocol and runs on TCP port 80.
Protocol history:
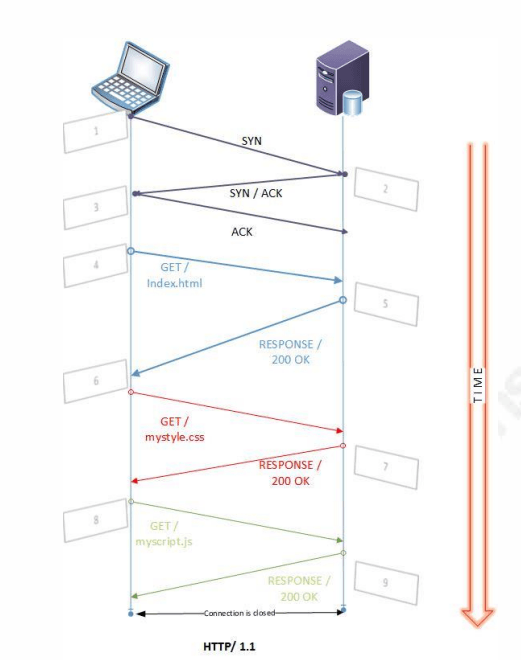
- HTTP/1.1 — 1997, still the most common baseline today
- HTTP/2 — 2015, binary and multiplexed, almost always run over TLS, uses HPACK header compression
- HTTP/3 — runs over QUIC instead of TCP, transported over UDP, requires TLS, uses QPACK header compression
What HTTPS adds (TLS layer):
HTTPS is what encrypts the traffic — plain HTTP is unencrypted by default. TLS itself is just a wrapper that sits over other protocols; it doesn't change what's being transported, just how it's protected in transit.
Why this matters for packet capture analysis:
- REST API activity inspection
- Exfiltration and infiltration attempts
- User web tracking
- File upload/download activity
- Beaconing (C2, malware check-ins)
1.2 TLS Fundamentals
TLS handles three things: the handshake, encryption of the data, and integrity checking. TLS has gone through several versions (1.0 → 1.3), and the version matters directly for decryption capability.
The TLS handshake at a high level:
- Client Hello — the client sends supported cipher suites, compression algorithms, and TLS extensions.
- Server Hello — the server picks the best match from what the client offered.
- Certificate exchange — the server sends its certificate (public key, signed by a trusted CA).
-
Client verification and key exchange — the client
checks the cert and establishes the session key:
- With RSA key exchange, the client encrypts a pre-master secret using the server's RSA public key — the server's private key alone can later decrypt it.
- With DHE/ECDHE key exchange, both sides derive the same shared secret via Diffie-Hellman math. The server's long-term private key only signs the exchange — it cannot retroactively decrypt sessions. This is what makes it PFS.
1.3 HTTP Versions — Why It Matters for Wireshark
HTTP/1.1, HTTP/2, and HTTP/3 (QUIC) all show up differently in a packet capture, and that affects which Wireshark filters and dissectors you need.
1.4 Encryption Standards
Key Exchange / Asymmetric (Handshake Layer)
| Algorithm | PFS | Notes |
|---|---|---|
| RSA | No | Private key = decryption key. Removed in TLS 1.3. |
| DHE | Yes | Ephemeral Diffie-Hellman, older PFS standard. |
| ECDHE | Yes | Elliptic curve variant of DHE, modern standard. |
Bulk Encryption (Data Layer)
| Algorithm | Notes |
|---|---|
| AES-128/256-GCM | Most common — what actually encrypts the payload data. |
| ChaCha20-Poly1305 | Common on mobile/low-power devices, pushed by Google. |
Integrity / Hashing
| Algorithm | Notes |
|---|---|
| SHA-256 / SHA-384 | Seen in every cipher suite string, ensures data integrity. |
1.5 Cipher Suite Breakdown
A cipher suite string tells you everything about how a session was negotiated. Example:
TLS_ECDHE_RSA_WITH_AES_256_GCM_SHA384
 TLS   ECDHE   RSA    AES_256_GCM   SHA384
        |       |          |           |
      Key     Auth       Bulk        Hash/
    Exchange           Encryption    MAC
Reading it left to right tells you the key exchange method (and therefore whether the session is PFS), the authentication method, the bulk encryption cipher, and the hash/MAC algorithm.
1.6 PFS vs Non-PFS — The Fork in the Road
Perfect Forward Secrecy (PFS) means a random ephemeral key is generated per session, so that even if the server's long-term private key is later stolen, past sessions can't be retroactively decrypted.
- Non-PFS (RSA): the session key is encrypted with the server's public key → the private key decrypts it → Wireshark can replay this decryption at any time on any old capture, as long as you have that one private key.
- PFS (DHE/ECDHE): ephemeral keys are never stored anywhere → the private key alone is useless for decryption → you need the session secrets logged at runtime instead.
All PFS standards use the exact same decryption method in Wireshark — it doesn't care whether the session used DHE or ECDHE, session secrets are session secrets. The only real fork in the road is RSA (private key) vs anything PFS (SSLKEYLOGFILE).
- Non-PFS needs something from the server — which you'll rarely have unless you control the server yourself.
- PFS needs something from the client — which you can always set up yourself, since you control your own browser/endpoint.
This is what makes SSLKEYLOGFILE the only practical
method for client-side captures, regardless of whether PFS is in
play — in the real world, you almost never have someone else's
private key, but you always have access to your own client.
1.7 Decryption Method Mapping
| Standard | PFS | Decryption Method | What You Need |
|---|---|---|---|
| RSA | No | Private key in Wireshark | Server .pem / .key |
| DHE | Yes | SSLKEYLOGFILE | Initial handshake + rekey secrets |
| ECDHE | Yes | SSLKEYLOGFILE | Initial handshake + rekey secrets |
§ 2 Prerequisites
2.1 Non-PFS — Getting the Server Private Key
If you're running your own web server (lab environment), the private
key was generated when you created your certificate — typically a
.pem or .key file.
Common locations depending on your stack:
- Apache:
/etc/ssl/private/ -
Nginx: wherever you pointed
ssl_certificate_keyin your config -
Let's Encrypt:
/etc/letsencrypt/live/<domain>/privkey.pem
Format Wireshark expects:
-
RSA private key in PEM format (
-----BEGIN RSA PRIVATE KEY-----) -
If yours is in PKCS#12 /
.pfxformat, convert it first:
openssl pkcs12 -in cert.pfx -nocerts -nodes -out privatekey.pem2.2 PFS — Setting Up SSLKEYLOGFILE
Linux
The most common failure is setting SSLKEYLOGFILE in a
terminal that isn't the same process tree Firefox launches from
(e.g., setting it in one terminal, then launching Firefox from your
GUI app launcher instead of that terminal). Don't do this — launch
Firefox from the same terminal session where you set the variable.
export SSLKEYLOGFILE=~/sslkeylog.log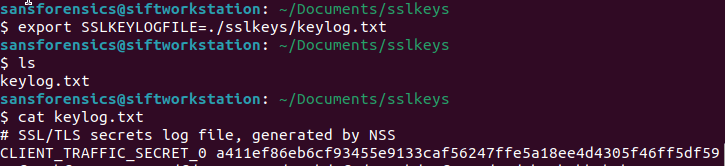
cat keylog.txt confirming the browser is
writing keys (CLIENT_TRAFFIC_SECRET_0 entry visible).
To make it persistent (for future shell launches),
add it to ~/.bashrc or ~/.profile:
echo 'export SSLKEYLOGFILE=$HOME/sslkeys/keylog.txt' >> ~/.bashrc
source ~/.bashrc
Note: .bashrc only applies to interactive bash shells —
if Firefox is launched via a .desktop file or the GNOME
app launcher, it may not go through bash at all.
For a foolproof method, create
~/.config/environment.d/envvars.conf for
systemd-managed sessions:
# ~/.config/environment.d/envvars.conf
SSLKEYLOGFILE=/home/YOURUSER/sslkeys/keylog.txt
Then log out/in, or reboot.
Windows (10 and 11)
Command line:
setx SSLKEYLOGFILE "C:\Users\<user>\sslkeylog.log"
Note: setx writes to the registry — open a new terminal
after running it for the change to take effect.
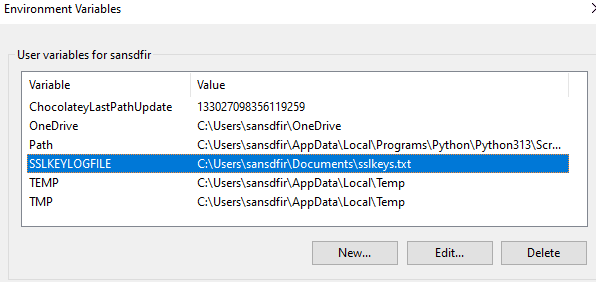
Or through the GUI (persists across reboots, recommended):
- Right-click Start → System (or Win+X → System)
- Click Advanced system settings
- Advanced tab → Environment Variables
- Under User variables, click New
- Variable name:
SSLKEYLOGFILE -
Variable value:
C:\Users\<YourUsername>\Desktop\sslkeys\keylog.txt - OK → OK → OK
Then reboot.
Rules that apply on both platforms:
- The browser must be launched after the variable is set, and from the same shell session (or login session for the persistent methods).
- Supported browsers: Chrome, Firefox, Edge — all honor SSLKEYLOGFILE natively.
- Do not use a browser that's already open — it won't pick up the variable retroactively.
Step 3 — Generate your traffic: browse to your target and trigger the HTTPS traffic you want to capture. The log file should populate immediately on the first connection.
Step 4 — Verify the keylog file:
cat ~/sslkeylog.logYou should see lines like:
CLIENT_RANDOM <hex> <hex>
CLIENT_HANDSHAKE_TRAFFIC_SECRET <hex> <hex>
SERVER_HANDSHAKE_TRAFFIC_SECRET <hex> <hex>
If the file is empty or missing, the browser didn't pick up the variable — go back to Step 1.
2.3 Scenario Artifacts
For this lab, the goal was to generate a realistic, varied set of artifacts to hunt for in the resulting pcaps:
- Google.com visit
- Search for "AnyDesk RMM tool"
- Visit the AnyDesk website
- Attempt to download the tool
§ 3 Decryption: Non-PFS (Private Key)
3.1 Minimal Lab Setup
Generate a self-signed cert + RSA key pair:
mkdir ~/tlslab && cd ~/tlslab
openssl req -x509 -newkey rsa:2048 -keyout server.key -out server.crt \
  -days 365 -nodes -subj "/CN=tlslab.local"
This gives you server.key (the private key you'll feed
into Wireshark) and server.crt.
Stand up a minimal TLS server forcing RSA key exchange (non-PFS):
openssl s_server is perfect for this — lightweight, no
real service to configure, and lets you explicitly pin the cipher
suite.
openssl s_server -accept 4433 -cert server.crt -key server.key \
  -cipher "AES128-SHA" -tls1_2 -www
Breaking this down:
-
-cipher "AES128-SHA"— a plain RSA key exchange cipher suite (no ECDHE), exactly the non-PFS behavior we want. -
-tls1_2— forces TLS 1.2, since that's the last version where non-PFS RSA key exchange is even possible. TLS 1.3 removed it entirely. -
-www— makes the server respond to simple HTTP-ish requests with debug info, so there's something to see in the decrypted payload.
-tls1_2 and
-no_tls1_3 are two ways of expressing the same
restriction — OpenSSL will reject you if you pass both together.
Pick one; -tls1_2 is the more explicit/deterministic
choice for a repeatable lab.
3.2 Injecting a Visible Marker
Since s_client lets you type raw text into the TLS
session once connected, and s_server -www will echo
back request info, the simplest way to prove decryption is to
include a unique flag string as part of the HTTP request:
openssl s_client -connect localhost:4433 -cipher "AES128-SHA" -tls1_2Once connected, type:
GET /TLS-LAB-FLAG-DECRYPT-ME HTTP/1.1
Host: tlslab.local
(hit Enter twice — HTTP requests need a blank line to terminate headers)
The string TLS-LAB-FLAG-92f3a7-DECRYPT-ME is now
sitting inside the encrypted TLS Application Data record. Before
decryption, Wireshark shows this as garbage ciphertext. After
loading the RSA key, the string appears plainly in the decrypted
HTTP tab.
3.3 Loading the Key into Wireshark
- Open Wireshark and load your
.pcap - Navigate to Edit → Preferences → Protocols → TLS
- Add the private key under RSA keys list (IP, port, protocol, key file path)
| IP address | Port | Protocol | Key File |
|---|---|---|---|
| 127.0.0.1 | 4433 | http | /path/to/tlslab/server.key |

- Apply and observe decrypted traffic
- Verify it worked: the HTTP layer should now be visible in packet details — look for status codes, URIs, headers
3.4 Before / After
Before decryption — a TLS packet, but nothing readable:
9  0.005010134 127.0.0.1 -> 127.0.0.1 TLSv1.2  336 New Session Ticket, Change Cipher Spec
10 0.045451193 127.0.0.1 -> 127.0.0.1 TCP        66 44610 -> 4433 [ACK]
11 26.012479536 127.0.0.1 -> 127.0.0.1 TLSv1.2  171 [TLS segment of a reassembled PDU]
12 26.012589111 127.0.0.1 -> 127.0.0.1 TLSv1.2 2027 [TLS segment of a reassembled PDU]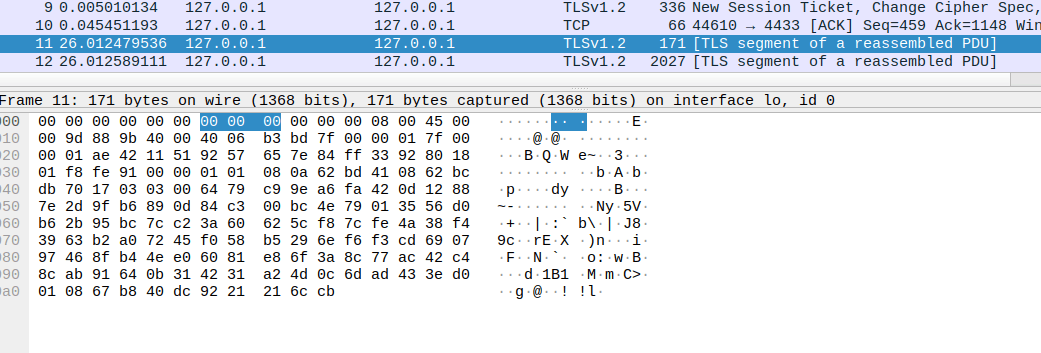
After decryption — the same packet, now with a Decrypted TLS section. Selecting that tab reveals the actual request:
Frame (171 bytes) | Decrypted TLS (56 bytes)

47 45 54 20 2f 54 4c 53  4c 41 42 2d 46 4c 41 47   GET /TLS-LAB-FLAG
2d 44 45 43 52 59 50 54  2d 4d 45 20 48 54 54 50   -DECRYPT-ME HTTP
2f 31 2e 31 20 48 6f 73  74 3a 20 74 6c 73 6c 61   /1.1 Host: tlsla
62 2e 6c 6f 63 61 6c 0a                             b.local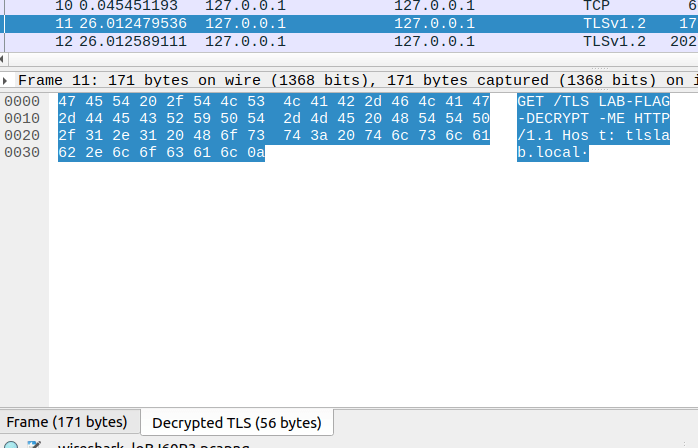
3.5 If It Didn't Work — Common Reasons
- Wrong key, or a key mismatch
- Capture was TLS 1.3 — the private key method is not supported on TLS 1.3 (RSA key exchange doesn't exist in 1.3)
- Key is not in PEM format
§ 4 Decryption: PFS (SSLKEYLOGFILE)
SSLKEYLOGFILE (see Section 2.2), start a
Wireshark capture on your active network interface, then browse
normally — any HTTPS site will do. Stop the capture, save the pcap,
and follow the steps below to decrypt it.
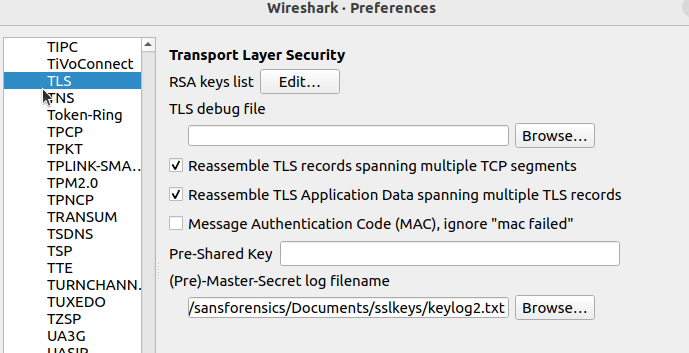
4.1 Loading the Keylog into Wireshark
- Open Wireshark and load your
.pcap - Navigate to Edit → Preferences → Protocols → TLS
- Point Wireshark at your keylog file in the (Pre)-Master-Secret log filename field
- Apply and observe decrypted traffic
- Verify it worked: HTTP layer visible, status codes, URIs, and headers readable in packet details
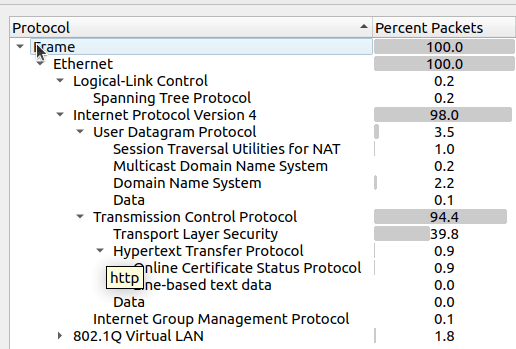
4.2 Before / After
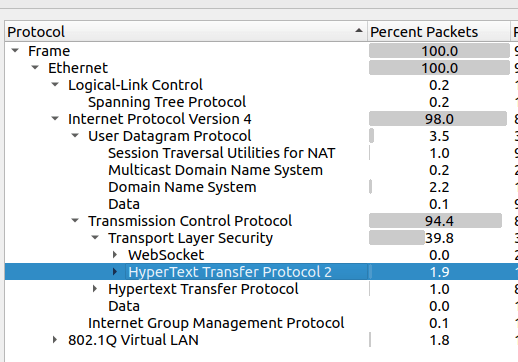
Before decryption — protocol hierarchy shows HTTP traffic, but no HTTP/2 or HTTP/3, which is unusual for a modern browser hitting a modern website:

dns,
showing queries for pagead2.googlesyndication.com and anydesk.com
— hostnames visible via plaintext DNS resolution even before any
TLS decryption.
After decryption — protocols previously hidden inside TLS are now visible, including HTTP/2:
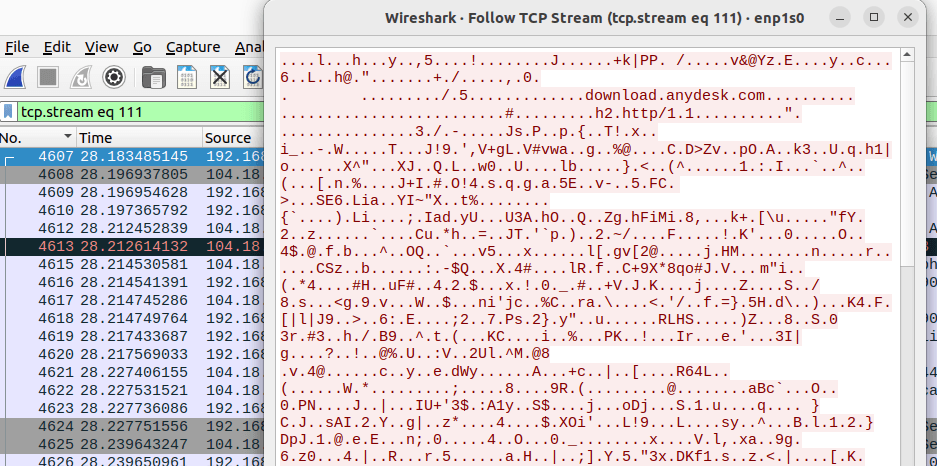
If we follow the TCP stream, we can even see the visit to download the AnyDesk app:
4.3 A Note on QUIC / HTTP/3
This same SSLKEYLOGFILE method also decrypts QUIC/HTTP-3 traffic — Firefox writes QUIC secrets to the identical keylog file, since QUIC uses the same TLS 1.3 stack under the hood, just tunneled over UDP instead of TCP. A Google search performed with HTTP/3 enabled will show up as a wall of QUIC packets rather than HTTP/2, and pointing Wireshark at the same keylog file decrypts those sessions the same way.
4.4 If It Didn't Work — Common Reasons
- Keylog file didn't cover the session start
- Browser wasn't launched from the correct shell session after setting the variable
- Keylog file and pcap don't cover the same session
.pcap and your keylog file or private key must cover
the same session. If you captured traffic without your prereqs
ready, decryption will fail. Always have everything running before
you generate traffic.