
1. Scenario Overview
This is my first dive into Sherlock HTB boxes. These are the opposite of traditional HTB challenges, where the focus is on red team activities like finding flags through exploitation of a box. Sherlocks, on the other hand, are about investigating potential suspicious or malicious activity.
Scenario: We have a potentially compromised Confluence server that we've been asked to investigate.
- Objective: Analyze logs to identify brute-force activity, successful logins, session details, and post-compromise actions.
- Skills Developed: Log analysis with grep, parsing binary logs with Python scripts, correlating events across log files, identifying persistence techniques, and mapping to MITRE ATT&CK.
- Platform: Hack The Box Sherlocks
2. Provided Artifacts
Once we download the Brutus Logs, we see three files: auth.log, wtmp, and utmp.py.

- auth.log: A critical system log on Debian-based Linux distributions that records all authentication and authorization activities.
- wtmp: A binary log that records a complete history of all user logins and logouts, as well as system events like reboots and shutdowns.
- utmp.py: A Python script to parse out relevant information from wtmp and display it in a readable format.
So this lays the groundwork for us to see authentication and login activity for the server. auth.log showed us the authentication and session creation as well as the user actions, whereas wtmp offers us the logins and logouts for the server.
3. Investigation Approach
From the logs provided, we are able to see the authentication as well as logins for the server. Here's a step-by-step breakdown of the investigation, aligned with the tasks presented in the challenge.
Task 1: What is the IP Address Used by the Attacker to Carry Out a Brute-Force Attack?

This question tells us a bit. First, we are looking for a brute-force attack, which is the act of attempting to guess the password of a login over and over with a wordlist. From an investigator's perspective, this should generate a large amount of unsuccessful logins.
If we simply cat the log, we are sifting through a ton of logs. What we can do is cat the file and pipe that into grep to display only lines that match a string.
Command: cat auth.log | grep -i "failed"
This outputs a refined list of lines from the log that will display only relevant information to what we are looking for.
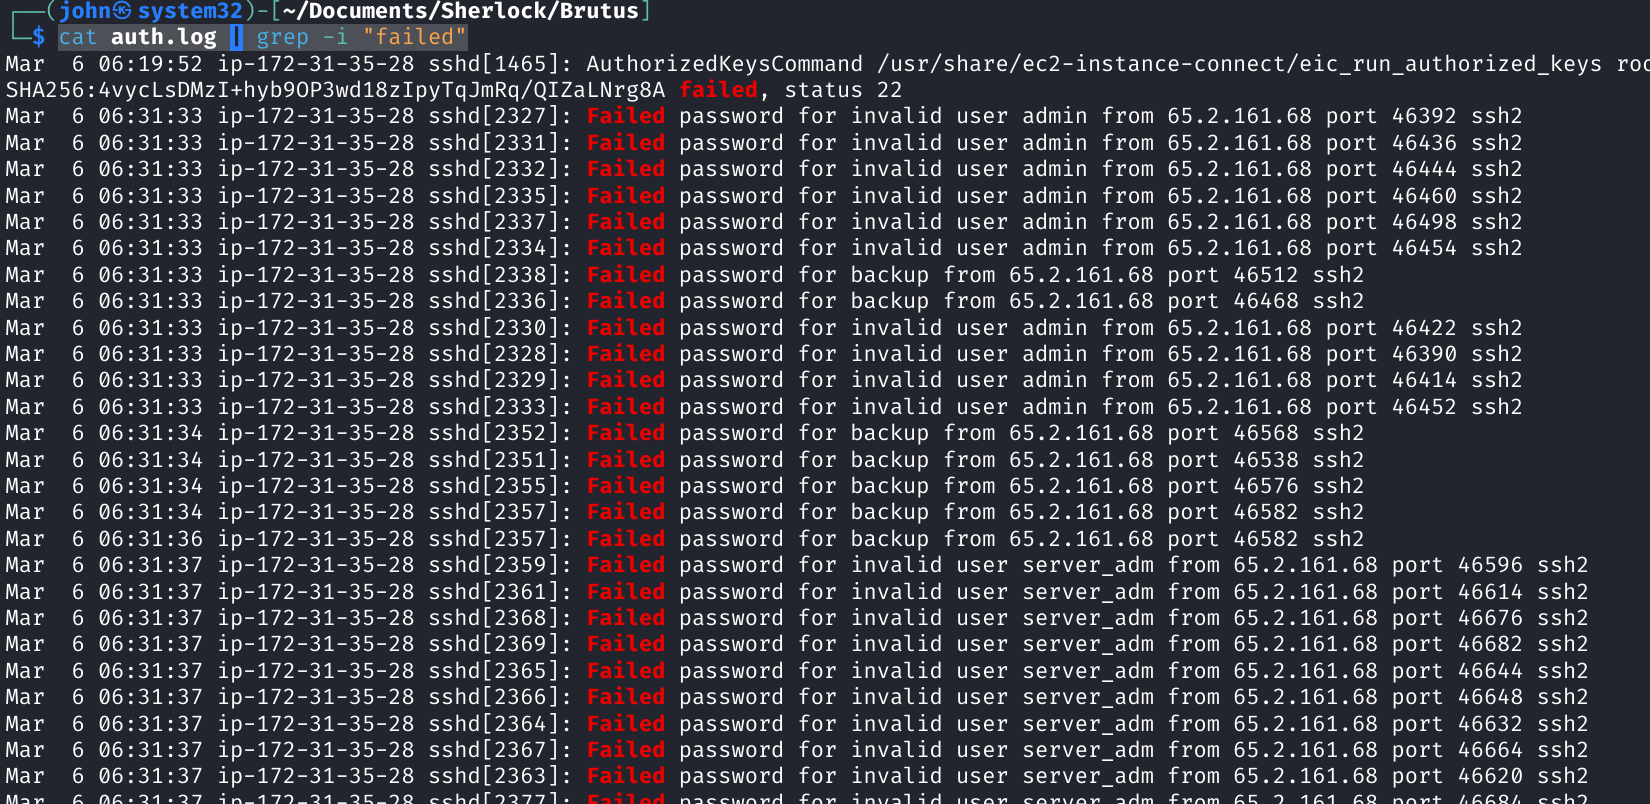
From here, we see that IP 65.2.161.68 is seen with the majority of failed logins from auth.log. If we examine a little deeper, we see that it is trying to login to several accounts (server_adm, svc_account, admin, root) — all common names for default accounts. Multiple failed logins from a single IP, targeting multiple accounts within the same second of time, points to a brute-force tool like Hydra or John the Ripper.
Task 2: What Is the Username of the Account the Attacker Gained Access To?

Let's take another look at auth.log. If we use grep but this time change the searchable string to "Accepted", we get a list of all successful logins.
Command: cat auth.log | grep -i "Accepted"

Here we see that the first successful login from the IP is at March 6 06:31:40 onto the root account.
Task 3: Identify the UTC Timestamp When the Attacker Established a Terminal Session

This lets us explore the wtmp file. To use the Python script, we want to run python3 and then the .py. The syntax should look something like this:
python3 utmp.py <filename>
or
python3 utmp.py <filename> -o <output filename>
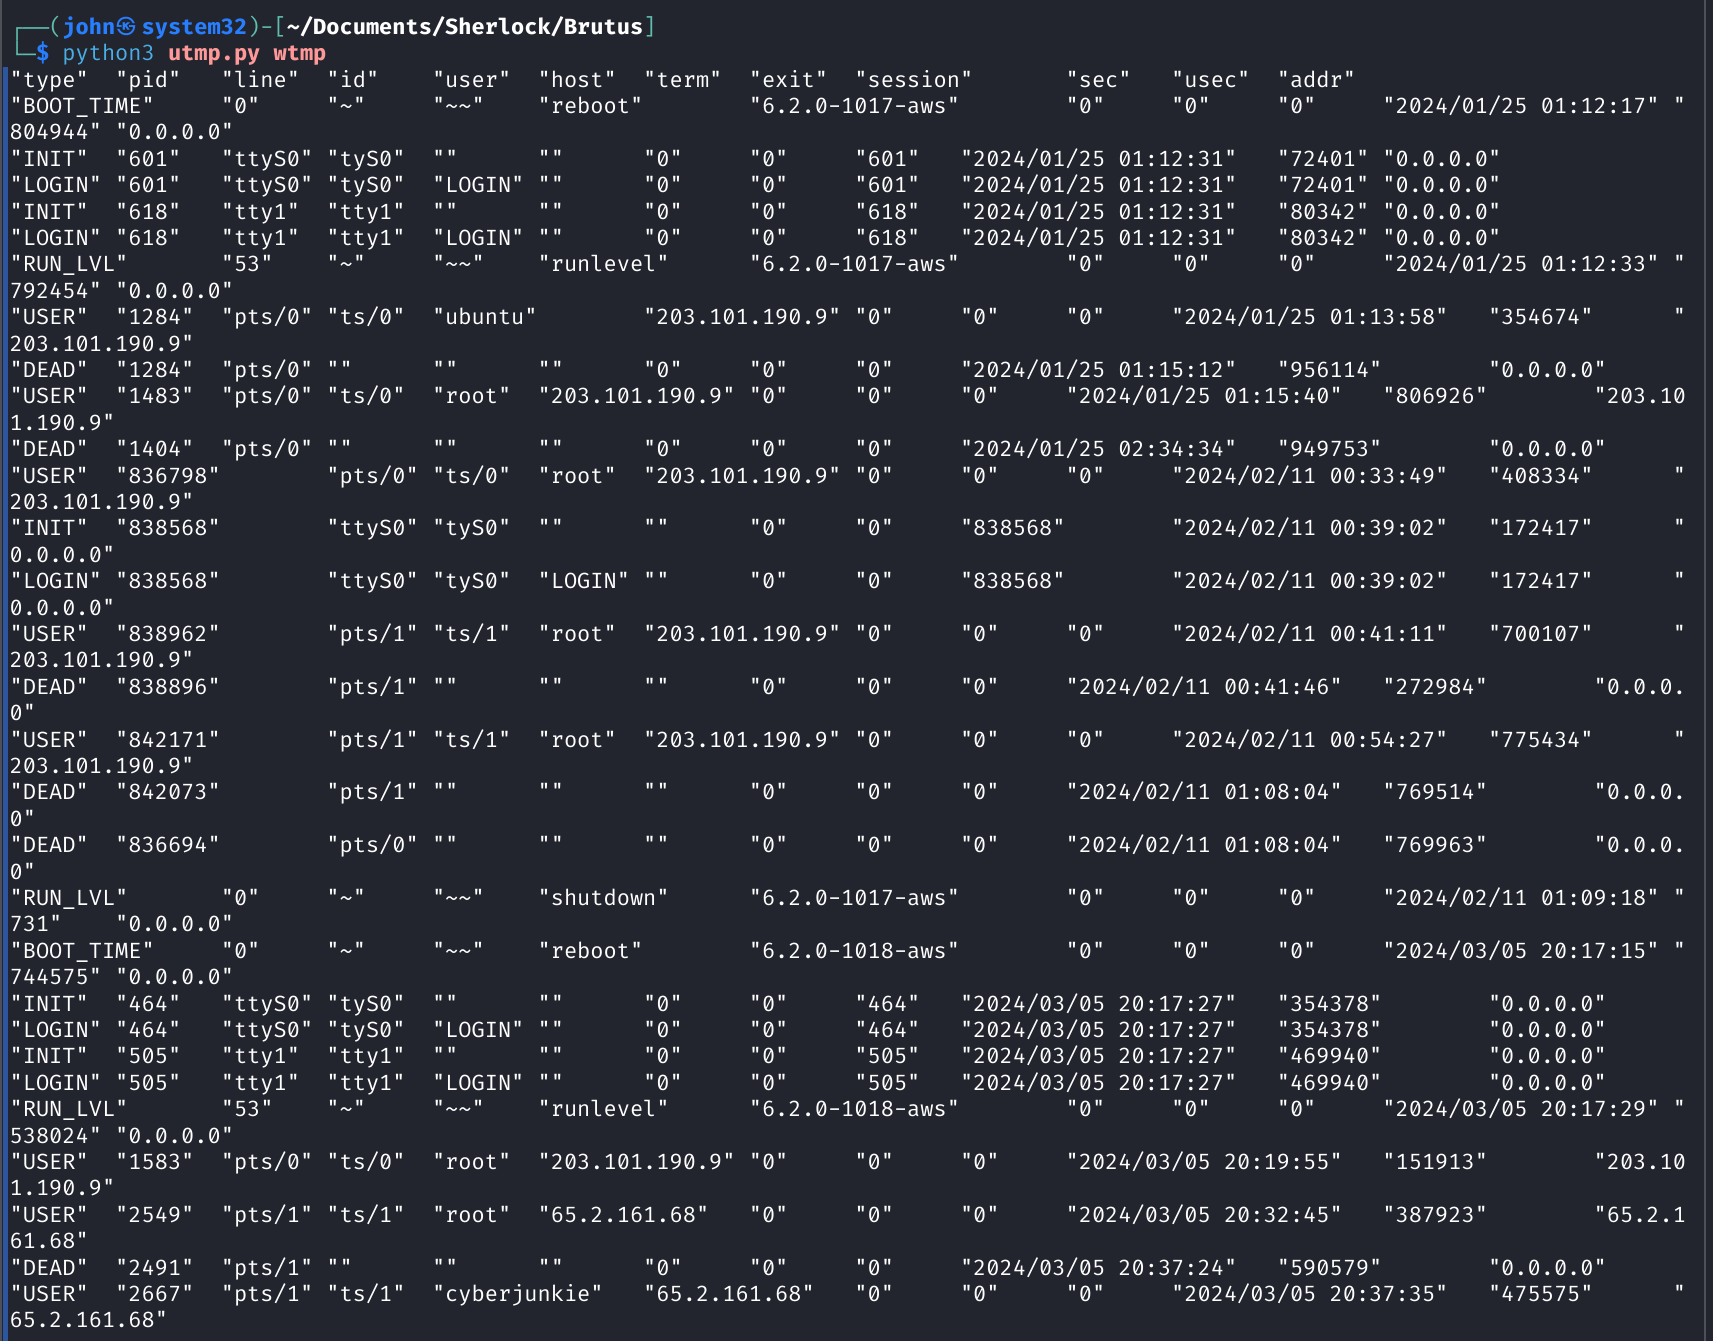
One thing we notice is that the auth.log is in UTC time but the wtmp file is not; it seems to be in local time for the server. The best way to examine this is to filter by attacker IP.
Command: python3 utmp.py wtmp | grep -i "65.2.161.68"

Here we get quite a bit of information. First, we see that root login was at 03/05 20:32:45 local time. Let's break that log down:
| Value | Meaning |
|---|---|
| "USER" | Record type — user process record |
| "2549" | PID of the user's login shell |
| "pts/1" | TTY/terminal used (pseudo-terminal slave 1) |
| "root" | Username of the person who logged in |
| "65.2.161.68" | Remote IP address (origin of the login session) |
| "2024/03/05 20:32:45" | Login timestamp |
As we can see, this is a user record type for a terminal being started for the root account under process ID 2549 from remote IP of 65.2.161.68.
Now we need to correlate this to the LOGIN time. So let's pivot back to auth.log and look for timestamps around the login time.
Command: cat auth.log | grep -i "login"

From these logs, we can determine that the actor was able to login and establish a terminal at 06:32:45 UTC after converting time to UTC.
Task 4: What Is the Session Number Assigned to the Attacker's Session?

We need to ID the session number that the attacker was assigned on login. From previous logs, we know he was assigned session number 37 seen in auth.log.
Task 5: What Is the Name of the Persistence Account the Attacker Created?

Now we need to identify what the attacker did directly following terminal establishment.
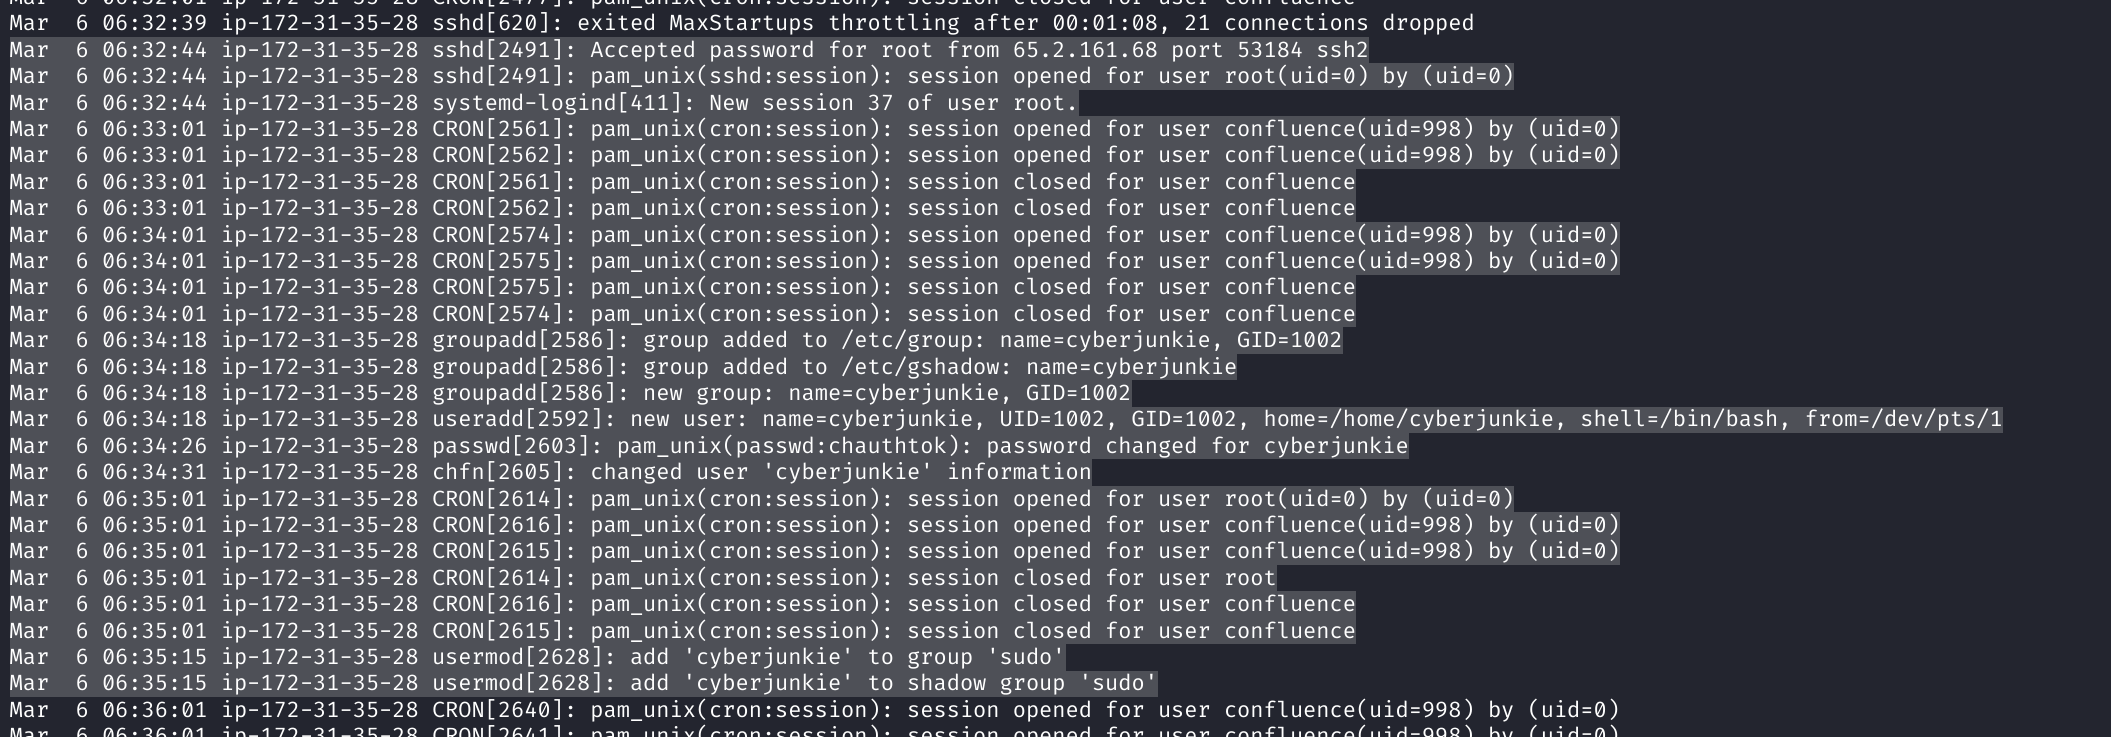
If we inspect the highlighted logs from the screenshot above, we see that directly following the login at 32:44, we see the actor create an account named cyberjunkie and then add them to the sudo group. This is a common method of persistence for threat actors to pivot from a compromised account to a new account with root permissions.
Task 6: What Is the MITRE ATT&CK Sub-Technique ID Used for Persistence?

Quick hop over to attack.mitre.org.
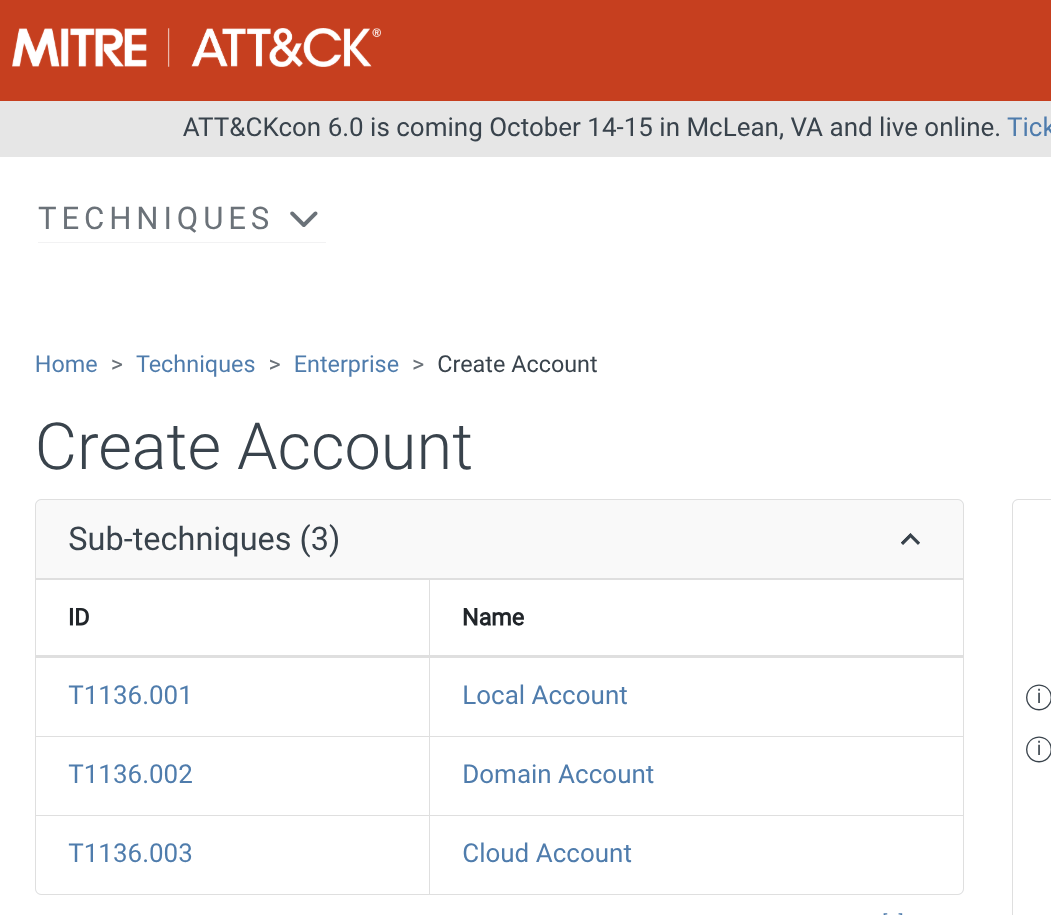
We see that Technique "Create Account" with sub-technique of "Local Account" — T1136.001 — is the answer to this task.
Task 7: What Time Did the Attacker's First SSH Session End?

From previous tasks, we know his session was #37. One quick command we can run is cat auth.log | grep -i "Session 37".

Therefore, we know his session ended at 06:37:44.
Task 8: What Actions Were Run Once He Was Able to Login as His Backdoor "cyberjunkie" Account?

If we grep for cyberjunkie logs, we see that they attempted to curl for a Linux enumeration script from GitHub following login. This is a common technique for attackers to enumerate their target post-compromise.

4. Summary of Findings
We investigated a confirmed case of compromise on a Confluence server where an external attacker brute-forced an SSH login from IP 65.2.161.68. He was able to login as root, create a backdoor via a local account named cyberjunkie, then logged back in and attempted to pull down a Linux bash script (LinEnum.sh) for target enumeration post-initial access.
5. Recommended IR Actions
Isolate the system from the network via logical VLAN or layer 1 Ethernet disconnect. Image the system and establish chain of custody. Reimage to a known safe image and reset the root password. Make root a no-login account to prevent brute-force. Confirm password and no-login for root and allow the system back on the network. Deep dive into the image for any other actions from the user. Check other servers for root login from this IP since the threat actor had the password and password reuse might be in effect.
6. Lessons Learned and Tips
- Tip 1: Use grep extensively for filtering logs to focus on key events like "failed" or "Accepted".
- Tip 2: Correlate timestamps across logs (auth.log in UTC vs. wtmp in local) and convert as needed for accurate timelines.
- Tip 3: Look for post-login actions like user creation and group additions as indicators of persistence.
- Tip 4: Map findings to MITRE ATT&CK for standardized threat classification.
- Key Lesson: Binary logs like wtmp require parsing tools; always inspect provided scripts before use.
- Future Goals: Practice more with advanced log analysis tools like ELK Stack and deepen knowledge of Linux forensics.
7. Conclusion

Brutus was a great introductory Sherlock challenge that sharpened my skills in log analysis and incident investigation. Identifying the brute-force, persistence via account creation, and mapping to MITRE provided valuable insights into blue team workflows. Looking forward to more forensics-focused boxes!
8. Additional Notes
- For more on MITRE ATT&CK Create Account: Local Account, see T1136.001.
- utmp.py was crucial for parsing wtmp — always verify scripts from challenges.
- Common post-compromise tools like LinEnum.sh are red flags in logs.